Lab 6: CUDA
Due Sunday, 9 November 2025
This is a one week partnered lab assignment
1. Lab Goals
Through this lab you will learn to
-
Use CUDA to solve a general purpose GPU computing task with synchronization
-
Create and animate a scene with CUDA
1.1. References
GPU Specs page - sort by cores to find better/worse GPUs. Most of the new installs from the summer (133 machines) have the A2000 GPUs.
1.2. Cloning Files
First, we will make directory for all our labs and clone lab6 from Github CS40-F25 org
cd ~/cs40
pwd             #should list /home/you/cs40/
git clone git@github.swarthmore.edu:CS40-F25/lab6-you-partner.git
1.3. Building and Running your lab
cd ~/cs40/lab6-you-partner
mkdir build
cd build
cmake ..
make -j8
./maxval
./circleArt
The ./maxval program just displays a result to the terminal (there is no graphics window). The ./circleArt application should display three overlapping circles to start.
If you change the source code, you only need to re-run make -j8 and then ./lab4 again to see your changes. The -j8 flag tells make to use up to 8 threads to speed up the build. make without the -j flag will work, but may be slower.
2. Part 1: Max Value
First compile and run maxval.cu`. This program is supposed to compute the maximum of an array of floats. Initially a CPU only version has been provided for you. I provided various timing code to time the GPU and CPU versions of this max function.
Your first step is to write a simple CUDA kernel that works with only multiple threads and one block. Because a global CUDA kernel can only have a void return type, the variable partial_c can be used to hold a GPU buffer that can store one or more results. Call your kernel max_gpu_thread, and have it store the max value amongst all the threads in the first index of the results buffer. Call your kernel in main with one block and one thread, and note the time. Check that your GPU result matches the CPU result before proceeding.
As noted in the code, you should use shared memory and a parallel reduction within each block. You can use the dot.cu demo as a guide for the setting up shared memory. The parallel reduction we finished in class for the dot product is pasted below. You can use a similar pattern to compute your max value.
/* This reduction assumes blockDim is a power of 2
     A reduction can work for any size, but the
     indexing becomes a little more tricky */
int i=blockDim.x/2;
while(i != 0 ){
  if(threadIdx.x < i){
    /*reduce!*/
    cache[threadIdx.x] += cache[threadIdx.x+i];
  }
  __syncthreads();
  /*outside branch but inside loop to prevent deadlock  */
  i/=2;
}
Next, change the size of N in main from 32 to 32*1024*1024. Run your code and note the time for the GPU and CPU versions. If your GPU version is significantly slower, that is OK at this point. Next, make the following changes and run some experiments. Note, the GPU version may be so slow that it times out. If this happens, decrease the size of N until the kernel is able to finish.
2.1. Experiments
2.1.1. Thread Kernel
Call your max_gpu_kernel kernel with the following number of threads and record the time: 32, 64, 256, 512. In this version, you should only have one block, so all threads in a block can communicate and determine a single answer for the max of the array. Using shared memory, compute the global answer and write one value to *c. Since the number of threads will vary, you can overprovision the size of the shared memory array to be the maximum number of threads (512 or even 1024)
2.1.2. Block/Thread Kernel
Next write a kernel called max_gpu that can be called on an arbitrary number of blocks, each with multiple threads. Try various block and thread counts when calling your kernel, reporting at least three experiments and highlighting the parameters that result in the shortest run time. At the thread level, you should use shared memory and a parallel reduction to compute the maximum value per block.
Summarize your results in the README.adoc file
3. Part 2: Circle Art
In this part, you will use CUDA and the ParaVis library to render and animate a list of semi-transparent circles on the screen. In this application we assume our view is a static 2D world view bounded between 0 and 1 in the x and y directions. This world view is rendered onto an image containing w columns and h rows with (r,c)=(0,0) in the upper left and world coordinates (x,y) = (0,0) in the lower left.
In this world, we have a set of Circles described in the lightweight class circle.h. Each circle has a center position, a radius, a color, along with a velocity (vx,vy,vz) and transparency between 0 and 1 with 0 being completely transparent, 1 being opaque.
The functions in scenes.h can generate a set of circles in this world and return them as a CircScene struct containing a pointer to an array of circle objects and a count of the total number of objects. Because CUDA cannot easily compile complex C++ code including Qt5 code, we don’t have the luxury of using QVector3D or similar QList objects to store our information.
In viewer.cpp we create a QTViewer application like several examples in class. We additionally make a scene and pass the resulting circles to a new Animator subclass you will create called CircleRenderer. Your primary task is to complete several CUDA kernels that will draw the set of circles into a buffer, and also animate the scene.
3.1. Understanding the Renderer
Every CUDA Animator in the QTViewer framework must implement a update(ImageBuffer *img) method that writes colors to an array of pixels stored in img→buffer. You can see examples of how this is done in several of the in class examples as well as the clearImage kernel which has been completed for you. The update method gets called repeatedly in an openGL event loop and, if you draw a new image each time update is called, you will see an animation.
For this example, the primary update loop will be
clear the entire screen
move the circles according to their velocity
draw the circles in the image buffer
Right now, only clear is implemented. It takes a clear color as input and writes that color to every pixel in the image buffer. You should examine the implementation of clearImage in clearImage.cu to understand how it works and how to work with the ImageBuffer.
drawCircsWrong has an implementation that attempts to draw the circles using CUDA, but it isn’t quite right. It works OK if you only have a single thread, but that isn’t very parallel or scalable. drawCircsWrong parallelizes the problem the distributing all the circles over all the threads. For each circle, a thread computes a bounding box around the circle, and finds the rows and columns of the image contained within that box. For each pixel in the box, it checks if the center of the pixel is inside the circle. If the pixel overlaps, the old color in the image buffer and the color of the circle are blended together according to the blending function provided. You should not modify the blending function. However, you should note that the order of blending the circles matters and can lead to different results. Your rendering must preserve the order of the circles as they are presented in the initial input array. drawCircsWrong may violate this property and the Readme asks you to think about why.
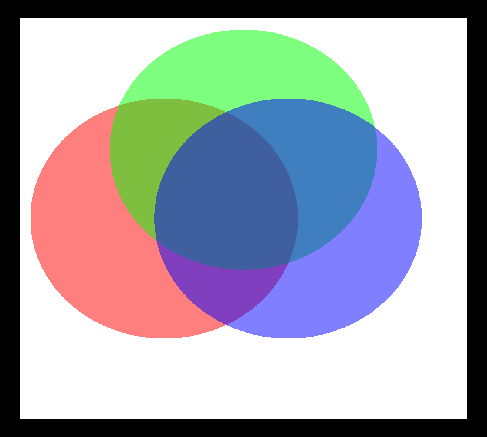
The correct order for the three test circles is to draw the red circle first, followed by the green then blue.
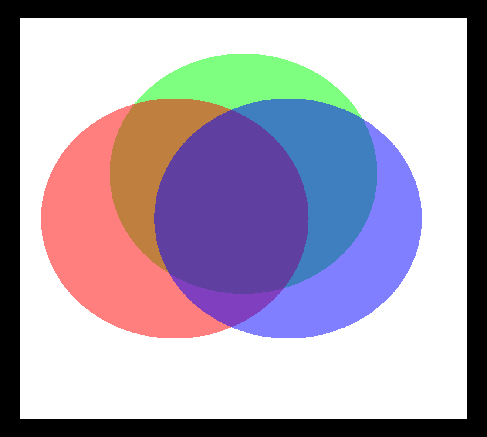
Two possible incorrect orders are blue, then green, then red
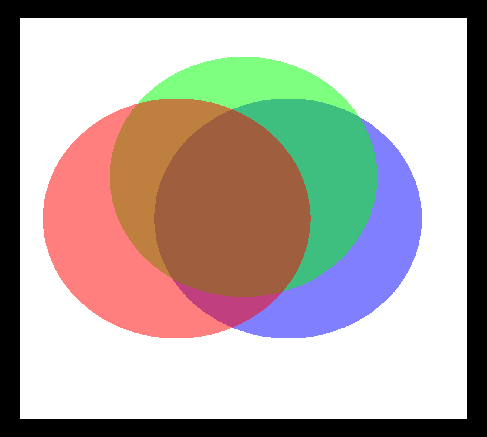
or green, then red, then blue.
You need to find a way to properly implement drawCircs. Implement your code in drawCircs, keeping drawCircsWrong unmodified. To test your solution, don’t forget to change the call in update in circRenderer.cu` to call your drawCircs kernel.
Once you think you have the drawing correct, implement the updating of your scene by writing one more kernel, moveCircs. Note that this kernel does not draw anything, but it simply updates the position of each circle to be the previous position plus the current velocity. Once the positions have been modified, the next call to drawCircs will draw the circles in their new location. If a circle moves completely off one edge of the screen, have it wrap around to the other side as demonstrated in lab.
Adjust numFrames in viewer.cpp to test your animation. Set numFrames=-1 to let it loop until you quit.
4. Readme.adoc
Answer the questions in the README.adoc file.
5. Summary of Requirements
Your project will be graded on the following components:
-
A maxval CUDA kernel that works for a variety of block/thread counts
-
Proper use of thread synchronization.
-
A working circleArt demo using CUDA threads
-
Correct blending of circles
-
Circle animation with edge wrapping.
You will not be graded on the lab survey questions in the Readme.adoc file
6. Submit
Once you have edited the files, you should publish your changes using add, commit and push.
The git push command sends your committed changes to the github server. If you do not run git push before the submission deadline, I will not see your changes, even if you have finished coding your solution in your local directory.
If you make changes to files after your push and want to share these changes, repeat the add, commit, push loop again to update the github server.
If you want to commit changes to files that have already been committed to git once, you can combine the add and commit steps using
$ git commit -am "bug fix/updates"The -a flag will automatically add files that have been previously committed. It will not add new files. When in doubt, use git status, and please do not use git add * ./
Please do not add your symlink to the data folder to the git repo. I have it set to be ignored, and it may create conflicts if partners are working with different links.