Lab 1: Image Processing
Due Sunday 14 September 2025, 11:59pm
This is an individual lab assignment. There will be an opportunity for partnered labs soon.
1. Lab Goals
Through this lab you will learn to
-
Setup and use tools needed throughout the semester
-
Manipulate images at the pixel level
-
Code in C++ using Qt6 and OpenGL
-
Program multiple fragment shaders in GLSL
-
Recognize the parallel nature of shader programming
2. References
-
-
GLSL functions start on page 9
-
-
Other Qt6 classes
-
The Book of Shaders - This has some good intro stuff on shaders, but also some advanced topics we will either cover later or not at all. Don’t worry if some of it seems advanced or confusing.
3. Cloning Files
First, we will make directory for all our labs and clone lab1 from Github CS40-F25 org
cd
mkdir -p cs40   #make your labs dir
cd cs40
pwd             #should list /home/you/cs40/
git clone git@github.swarthmore.edu:CS40-F25/lab1-you
See CS Git Help if you need a refresher on using git and github, or post a question on Edstem.
3.1. Building and Running your lab
Consult the README file in the w01-triangle repo for details on building a Qt6/OpenGL project using cmake and make. The steps are similar for this lab.
cd ~/cs40/lab1-you
mkdir build
cd build
cmake ..
make -j8
./lab1
The ./lab1 executable pops up a window and an OpenGL context. It is difficult to run this application remotely over an SSH connection, so you should run this on a CS lab machine.
If you change the source code, you only need to re-run make -j8 and then ./lab1 again to see your changes. The -j8 flag tells make to use up to 8 threads to speed up the build. make without the -j flag will work, but may be slower.
The window should look something like the image below.
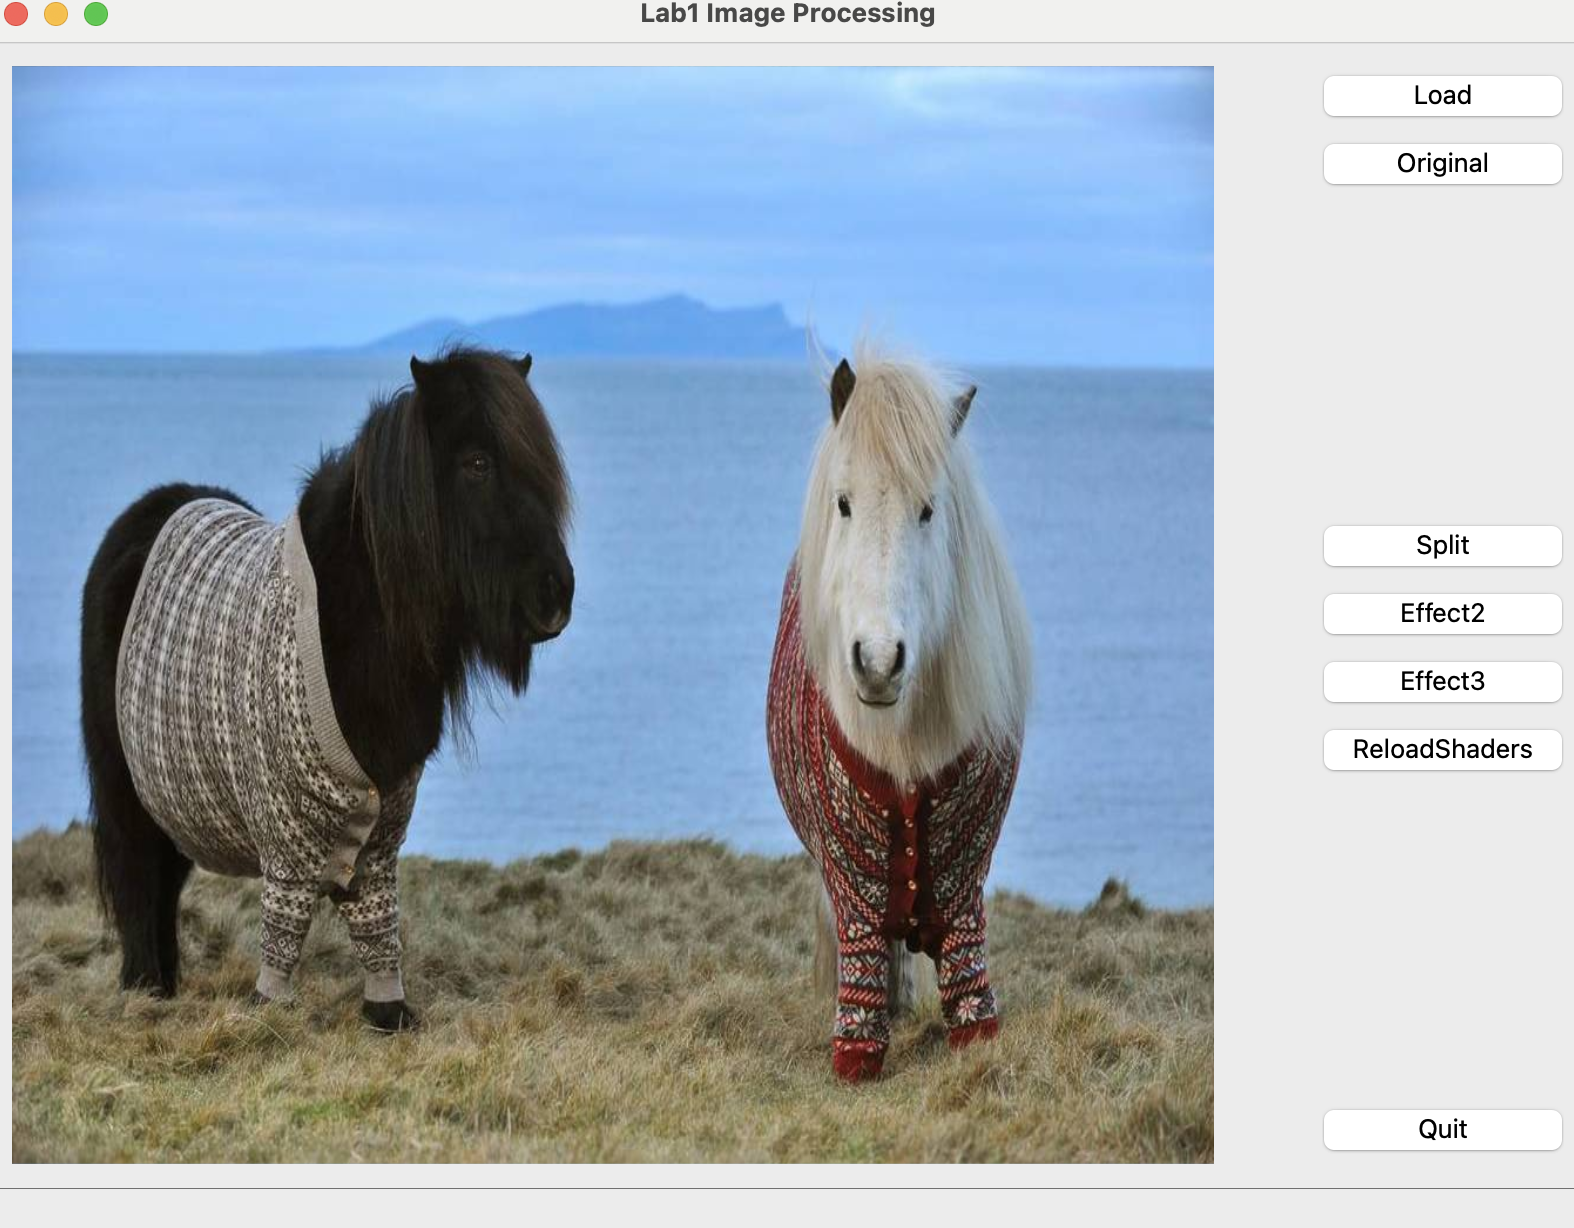
The buttons "Load", "Original", "Reload Shaders", and "Quit" should work without any modifications. You will need to implement the "Split Effect" button and two additional effects of your choosing. The "Split Effect" button is connected to a shader that you will modify it doesn’t work as expected yet.
4. Making Modifications
The goal for this lab is to use programmable fragment shaders to process a sample image using OpenGL. Since we don’t know that much yet about any of these topics, most of the boilerplate has been written for you and you can ignore much of the code provided.
When you click one of the buttons on the application, it triggers a Qt event to switch the current OpenGL program in use and redraw the canvas using the new filter. You will be asked to implement one filter of my choosing and then add two filters of your own.
When you first connect a button to your program, you will need to recompile the C++ code using make -j8 and then run the program again. If you are only modifying shaders, you can click the "Reload Shaders" button to reload the shader files without recompiling the C++ code or quitting the app. This is useful for quick iteration when debugging your shaders.
5. Add Split
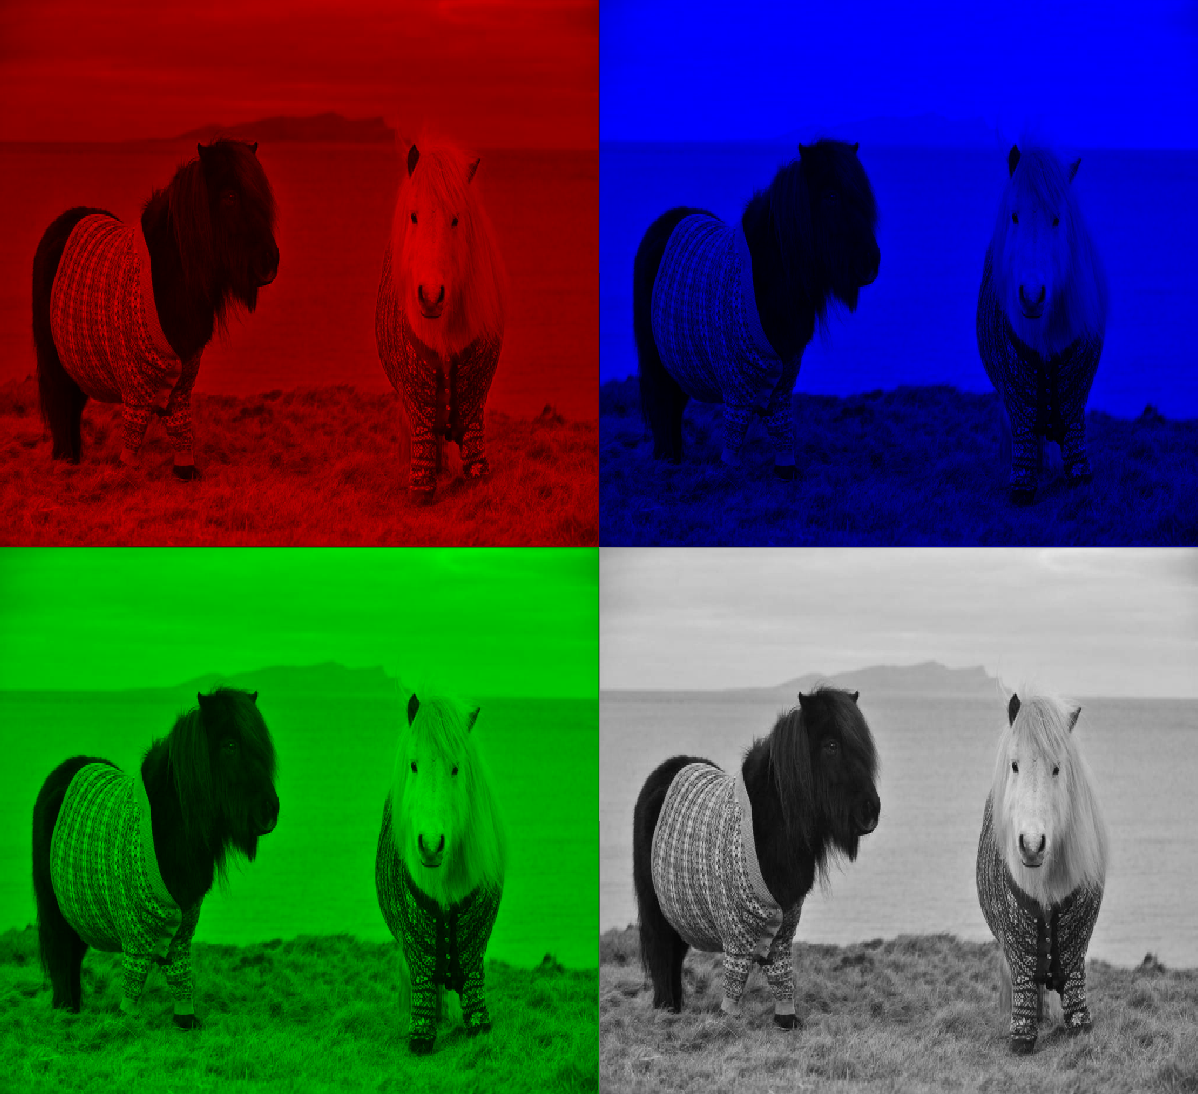
The split filter should split the original image into four mini images, with each image only showing one color channel; red, blue, green, and greyscale. The greyscale image is created by averaging the values of the red, green, and blue components of a given pixel.
With the starter code provided, the split button simply creates a image with the the left half showing being solid red and the right half showing the original image. Your output should be similar to the image below.
5.1. Shaders
You can implement this effect by modifying the file fs_split.glsl. This file contains the content of a OpenGL fragment shader, a programmable piece of code that runs for every potential pixel/fragment in an output image. We will go into more details about shaders throughout the semester, but this week, I’ll try to explain enough to get you started quickly.
Each fragment shader has a single main() function whose job is to compute and set a single output variable that is the color for a particular pixel. In this context, that output variable has the name fragColor and type vec4 meaning it has four components, a red, green, blue, and alpha channel. For this week, and for several more weeks, you can safely ignore the alpha channel and always set it to 1. You can access the individual components of a vec4 variable using the accessors .r, .g, .b and .a. These values are in the range 0.0 to 1.0, with white being vec4(1,1,1,1) and black being vec4(0,0,0,1).
float red = fragColor.r;5.1.1. Shader Parallelism
A single call to main() only processes a single pixel. OpenGL will call the shader multiple times for different pixels in parallel. This happens transparently behind the scenes without you needing to worry about it. You only need to worry about how to process one pixel.
Each time a fragment shader is called, it may have different input variables. In this example, the only input variable is
in vec2 fTexCoord;which describes the relative position of the pixel across the image. You can access the individual components of fTexCoord using .x and .y, both of which are in the range 0. to 1. for this lab.
We can use these fTexCoord coordinates to sample the provided image using
fragColor = texture(tex0, fTexCoord);and in fact, this is what is done for the fs_orig.glsl file connected to the Original button. Each time the shader is called, fTexCoord has a different value and a new color is computed at that position. When the shader is called for all pixels in the canvas, a copy of the original image is produced.
5.1.2. Modifying the Shader
Your first goal is to modify the body of main() in fs_split.glsl to compute the correct value of fragColor to implement the split effect. You can create additional helper variables, manipulate vectors, and tweak components as needed. It won’t be a single one liner, but it isn’t that long either.
Make small changes until you understand how things work.
Here are some examples that while wrong, might help you understand how the variables work.
fragColor = texture(tex0, 0.5*fTexCoord);vec2 offset = vec2(0.5, 0.5);
fragColor = texture(tex0, fTexCoord+offset);/* does not use colors from image at all */
fragColor = vec4(fTexCoord.x, fTexCoord.y, 0., 1.);Remember, the program will automatically run main() for you multiple times on each pixel, you do not need to write any nested for loops to process each row/column.
When you are adjusting the shader, you can click the "Reload Shaders" button to reload the shader files without recompiling the C++ code or quitting the app. This is useful for quick iteration when debugging your shaders.
6. Create Two New Effects
With one effect complete, be creative and add two more effects of your own choosing. Do not modify fs_orig.glsl or fs_split.glsl to implement your effects. Instead copy fs_orig.glsl to two new files and make your changes there, similar to how you modified fs_split. Your effects should be a bit more elaborate than the ones you may have done in a similar lab for CS35
In addition to adding new shaders, there are a couple other places where you must modify code, but these changes are relatively small.
At lease one of your effects should use a time component to create an animated effect. You can use the built in time variable that is already provided in the shader files. This variable is a float that counts the number of seconds since the program started. You can use this to create animated effects that change over time.
you will need to uncomment the //update() line in the MyOGLWidget::timerStep() method in myoglwidget.cpp
file to have your application trigger redraws every 20ms before you can see animated effects.
|
6.1. Adding Buttons
You need to connect new buttons for your new effects to your program. This is done in mainwindow.ui, myoglwidget.cpp, and myoglwidget.h.
Open mainwindow.ui in Qt Creator qtcreator. You should see a visual representation of the window with buttons. If needed, drag two new Push Button widgets from the left side panel to the right side panel, placing them below the existing buttons. Change the text on each button to something descriptive of your effect. Save the file.
6.2. Implementing a new effect slot.
After connecting the "clicked" signal of your new buttons to slots using qtcreator, you need to declare the slots in myoglwidget.h and implement them in myoglwidget.cpp. Use the same slot name you defined in qtcreator, and add a slot function in your myoglwidget.h header file. Look at split() for an example.
Add a name of your effect to the Effect enum in myoglwidget.h.
In myoglwidget.cpp implement the slot function you declared in myoglwidget.h. The body will be similar to split(), but with load the correct effect shaderProgram. To load the shader program for your new effect at the start up, make a call to addEffect() in MyOGLWidget::createShaders() in myoglwidget.cpp for each of your new effects.
If all those steps are done correctly, your new effects should apply when you click their appropriate buttons. If something isn’t working, check the steps above, or the TODO points in the code. Once the button is working, you can modify the shader file and use the "Reload Shaders" button to iteratively design, implement, and debug your effect.
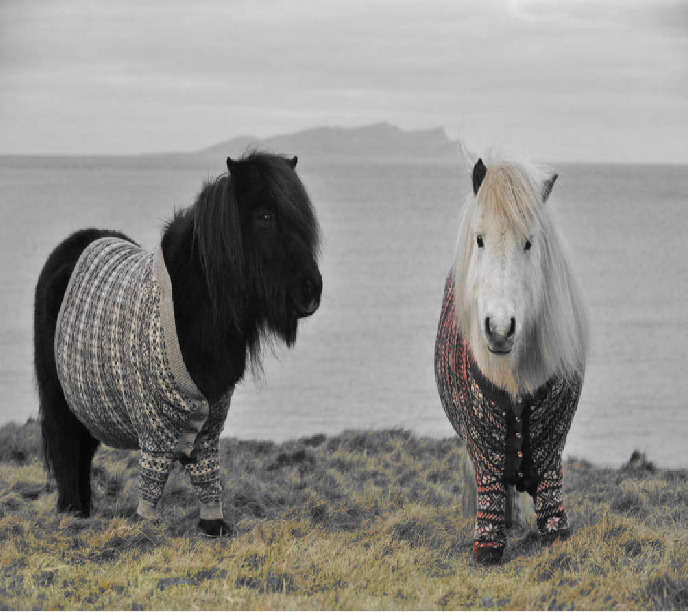
Below are two possible effects using somewhat advanced filters, but still within a single shader. Feel free to experiment.


7. Summary of Requirements
Your project will be graded on the following components:
-
A working split function plus one additional image processing effect that was not an effect you implement in the CS35 pic filter lab.
-
A second additional image processing effect that uses the
timevariable to create an animated effect. -
Easy to read shaders.
-
Answer to concept questions/survey questions in the
Readme.adocfile. -
A small percentage of your grade will be based on style, creativity, and your new effect. A very simple or a snarky make blank effect meets the letter of the requirements, but not the spirit. Have fun and try something a little more elaborate.
You will not be graded on the lab survey questions in the Readme.adoc file
You may add additional effects if desired, but only the first three effects (split + two of your choosing) are required. You may also add additional images in the data folder if desired, but please keep them relatively small (under 5MB total).
Submit
Once you have edited the files, you should publish your changes using the following steps:
$ git add <files you changed>The git add step adds modified files to be part of the next commit to the github server.
$ git commit -m "completed lab1"The git commit step makes a record of the recently added changes. The -m "completed lab1" part is a descriptive message describing what are the primary changes in this commit. Making a commit allows you to review or undo changes easily in the future, if needed.
$ git pushThe git push command sends your committed changes to the github server. If you do not run git push before the submission deadline, I will not see your changes, even if you have finished coding your solution in your local directory.
If you make changes to files after your push and want to share these changes, repeat the add, commit, push loop again to update the github server.
If you want to commit changes to files that have already been committed to git once, you can combine the add and commit steps using
$ git commit -am "bug fix/updates"The -a flag will automatically add files that have been previously committed. It will not add new files. When in doubt, use git status, and please do not use git add * ./
To recap, the git commit cycle is git add, git commit, git push. Don’t forget to git push when you have completed an assignment.
Errata
Writing your own functions in GLSL
You can define and write your own functions in GLSL. GLSL functions cannot be recursive. Variables defined in the shader header are in the global scope.
float maxcomp(vec3 color) {

    if (color.r >= color.g && color.r >= color.b) {
        return color.r;
    } else if (color.g >= color.r && color.g >= color.b) {
        return color.g;
    } else {
        return color.b;
    }
    /* alternatively, you can use the built-in max() function */
    return max(max(color.r, color.g), color.b);
}

/* A kernel function to get the 3x3 neighborhood of a pixel */
void kernel(vec2 coord, inout vec4 m[9]){
   vec2 d = vec2(1) / vec2(textureSize(tex0,0));
   m[0]=texture(tex0, coord-d);
   m[1]=texture(tex0, coord+vec2(0.,-d.y));
   m[2]=texture(tex0, coord+vec2(d.x,-d.y));
   m[3]=texture(tex0, coord+vec2(-d.x,0.));
   m[4]=texture(tex0, coord);
   m[5]=texture(tex0, coord+vec2(d.x,0.));
   m[6]=texture(tex0, coord+vec2(-d.x,d.y));
   m[7]=texture(tex0, coord+vec2(0.,d.y));
   m[8]=texture(tex0, coord+d);
}

void main() {
   vec4 m[9];
   kernel(fTexCoord, m);
   fragColor = m[4]; /* center value of kernel */
}
Vector components and swizzling
GLSL has built-in vector types vec2, vec3, and vec4 for 2, 3, and 4 component vectors. You can access the individual components of a vector using .x, .y, .z, .w or .r, .g, .b, .a. You can also use .s, .t, .p, .q for texture coordinates.
You can also use swizzling to create new vectors from existing vectors. For example, if you have a vec4 color, you can create a vec3 rgb using rgb = color.rgb; (discard any alpha component) or a vec2 xy using xy = color.xy;`
Most GLSL functions can take vectors as input. sin(p) where p is a vec2 will return a vec2 with the sine of each component.
Don’t panic on failed shader compile
If you make a mistake in your shader code, the shader may fail to compile. The program will continue as best it can, but the initial release may eventually crash the program.
You can apply the following change to make your program handle shaders that fail to compile more gracefully.
-
In
addEffect(), push anullptronto theshaderProgramslist if the shader fails to compile. This will keep the indices of theEffectenum and theshaderProgramslist aligned.if (!fs->compileSourceFile(fshaderFile)) { qWarning() << fs->log(); delete fs; shaderPrograms.append(nullptr); return; } -
In
destroyShaders(), check if the shader program isnullptrbefore trying to release it.while( !shaderPrograms.isEmpty()) { currentProgram = shaderPrograms.takeLast(); if (currentProgram){ currentProgram->release(); } delete currentProgram; }; -
In
paintGL(), check if the shader program isnullptrbefore trying to bind it.if (!currentProgram) { emit updateStatus("No shader program"); return; } currentProgram->bind(); -
Save, recompile, and run again. Now if a shader fails to compile, the program will not crash, but will display "No shader program" in the status bar and a blank canvas. You can then fix the shader code and click "Reload Shaders" to try again without quitting the app.
Missing gitignore
The lab1 repo is missing a .gitignore file to ignore build files. Please copy a .gitignore file from me and add it to your lab1 repo.
cd ~/cs40/lab1-you
cp ~adanner/public/cs40/.gitinore ./
git add .gitignore
git commit -m "added .gitignore"
git push
Files that should be ignored include the entire build, autogenerated CMakeFiles directory, and the cmake_install.cmake file, any .vscode directories, and in general anything automatically generated by cmake, Qt, QtCreator, vscode, or other editors.
GLSL syntax highlighting
If you are using vscode and your GLSL files do not have syntax highlighting, you can add it by installing the Shader languages support for VS Code extension (or GLSL linter) from the vscode extensions marketplace.